How to Open a Shopify Store: The Ultimate Beginner’s Guide
Opening a Shopify store is a great idea if you’re ready to take your e-commerce journey to the next level. Whether you’re brand new to selling products online or you’ve dabbled in other marketplaces like Etsy or Amazon, Shopify is the ultimate software for legitimizing your product-based business with your own storefront. Shopify can be overwhelming when you first sign up – especially if your only experience is a marketplace where a lot of the upfront work is done for you – but it doesn’t have to be. This post will go over the basics of how to open a Shopify store for beginners, no matter what kinds of products you want to sell.
(This post contains affiliate links)
What is Shopify?
Shopify is a subscription-based software that allows you to open your own standalone web store. This is different than selling on Amazon, Etsy, or eBay because there is no built-in marketplace traffic, but one benefit to having a Shopify is that it adds a level of professionalism to your brand when you have your own website.
It costs $29/month to run a Shopify store. There are no listing fees, so you can keep your items up at no cost as long as you want to sell them. Transaction fees are roughly 3-5% and will depend on the payment method you choose to accept in your store.
Is Shopify Right For You?
If you’re wondering whether you should start selling on Shopify or another platform like Etsy first, I have a more detailed comparison in my Etsy vs. Shopify post which will help you determine which selling platform you should use.
Since most of my readers are Etsy sellers who want to sell digital and/or print-on-demand products, my advice is to consider starting on Etsy, then open a Shopify store once your Etsy shop is making enough money that it would have a noticeable impact on your life if it were to be shut down. Once this is the case you’ll want a backup plan for added security, and Shopify is the best way to give yourself that insurance.
Shopify is also a great option if you’re selling products that cannot be sold on Etsy, such as dropshipped or wholesale products where you have no hand in the design or production process. Shopify has dozens of dropshipping and wholesale apps that you can easily connect to your store to browse products and list them for sale (more on that later).
How to Open Your Shopify Store
First, you need to open an account with Shopify. They have a free 14-day trial so you can play around in the dashboard and see how you like it. This post will help you make the most of those 14 days so you spend less time thinking “WTF am I doing” and more time taking action and building your store.
They will ask for your personal and store information, so enter in your store name and follow the prompts to access your store’s dashboard. Once you’ve filled out any requested information, you will be directed to your Shopify dashboard which can be accessed at your-store-name.myshopify.com/admin. Bookmark this page because this is where all the behind the scenes of your store happens, so you’ll spend a lot of time in your dashboard.
Your dashboard might have some prompts asking you to fill out details such as customizing a theme, setting up shipping settings, adding a payment gateway, etc. We will get to a lot of those in the next sections. You will also notice that it says your shop is password protected, which means it’s not visible to the public. This can be removed once you’re ready to launch. You can also give the password to other people if you want them to give feedback or do a test order before you go live.
Install and Customize a Theme
Your Shopify Theme is the front face of your store. Your theme is what you edit when you want to change the layout, colors, typography, or any other visual aspect of your store. You can access it under “online store” in the left sidebar, then “themes”.
There are hundreds of free and paid themes to choose from. A free theme will work fine for now while you’re still learning how everything works. Don’t spend too much time contemplating a theme. In my case, Shopify automatically installed a free theme called Dawn so I’m going to work with that for now. In my other Shopify store I use a paid theme called District. You can browse themes and install a new one in the Theme Library if you prefer.
Once you have a theme installed, click the “customize” button to bring up all the editing options.
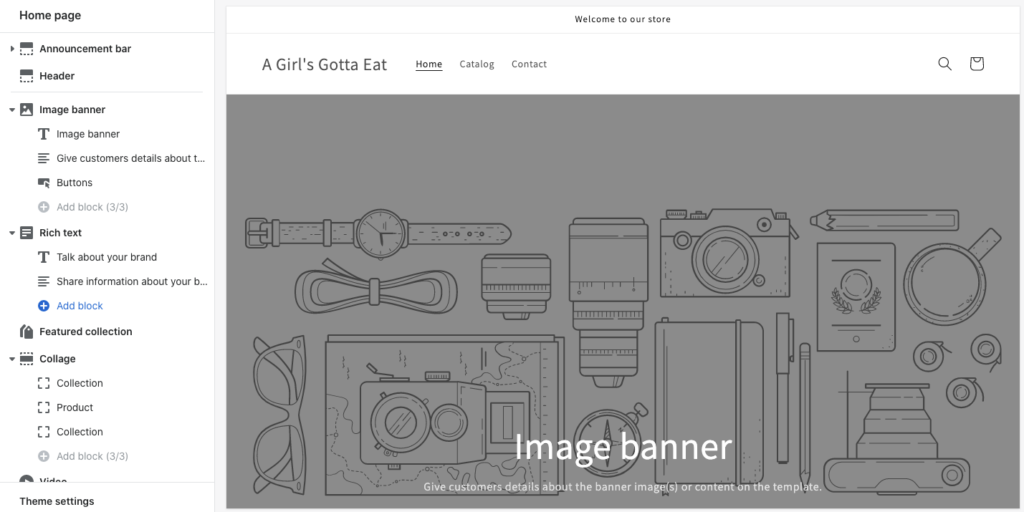
Everything you see listed in the left column is a block that can be moved, deleted, or customized to change the look and layout of your store’s homepage. Once you add products and collections, this will start to fill out with information and make more sense. You can come back to this page once you have some listings made.
For now, look at “theme settings” at the bottom of the menu. You can change your shop’s color palette, fonts, and other small details under this section. You can come back and change it anytime, so you don’t have to make any decisions right now. All you need right now is to have a theme installed and know where to go to edit it before you launch.
Add Collections to Your Store
You can do this before or after you add products, but it helps to set some up before you upload products so that you have an idea of how you’re going to sort them.
Collections are Shopify’s version of categories. There’s an infinite number of ways you can categorize your products using collections. Create a collection by going to “products” in the dashboard sidebar, then “collections”.
As an example, here’s how I break down my collections in my main print-on-demand store, which is basically a large apparel, accessories, and home goods boutique.
First, I create a collection for each type of product because it’s the most efficient way to allow customers to browse your items.
Unisex T-Shirts
Sweatshirts
Hoodies
Tank Tops
Apparel – this is automated to include all of the above collections
Coffee Mugs
Posters
Pillows
Home Goods – this is automated to include all three of the above collections
These all have conditions set that will automatically add relevant products as they are listed. So for coffee mugs I have the condition set that “coffee mug” or “drinkware” has to be the product type when I create a product listing for a coffee mug. This automatically categorizes it into the coffee mug collection.
I also have collections based on the specific theme of my products, which allows for more display customization:
Astrology
Politics
Feminism
Halloween
Christmas
420 Lifestyle
I set a condition for each of these collections that requires a specific word in the product tags. So for an astrology design I will make sure to type the word “astrology” in the tags to automatically sort it into the right collection. You can also create categories where you manually choose each product you want to include.
How to Create a New Arrivals Collection in Shopify
Here’s an easy way to get your newest products listed on the front page of your store as they’re added (or wherever else you want to place them). Create a collection called New Arrivals and set the automation to look like this:
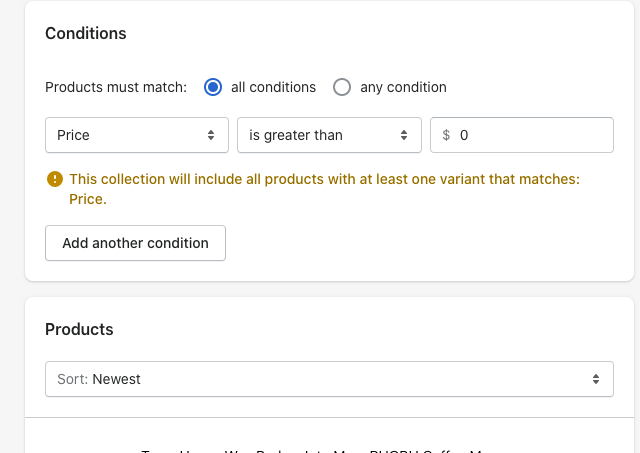
Make sure the “conditions” are that the price is greater than 0 (this will ensure it includes every product since everything is sold for more than that). Then, tell it to sort your products by newest. I have this collection halfway down my shop homepage so that visitors can see what has been added most recently.
You might not know what collections you want to create until you’ve added products, and that’s fine. You can always add products before you create collections and then decide how you want to categorize them from there. Collections can also be added, deleted, and changed at any time, so don’t feel beholden to whatever you’ve done.
Set Up Shipping Profiles
I keep my store as simple as possible by only shipping to the United States (for right now) and offering free shipping on all orders. I highly recommend free shipping because it’s what so many people expect now, but this will ultimately depend on what you sell. If you are selling furniture it is probably a much different situation than my POD company shipping a shirt. My profile is set for free shipping up to 50 pounds because I’ve never had a package come even close to that heavy.
You can create a shipping profile by going to Settings in the lower left corner, then shipping and delivery. Shopify can explain shipping profiles better than I can, so your best bet is to check out their shipping profile overview which includes a video walkthrough of how it works.
Add Payment Methods
Another important thing you’ll want to get out of the way in your settings is payment methods. This is where you’ll decide which types of payments you accept in your store. Shopify will ask for some personal information about you and your business, so fill out the requested information (if it’s just you, choose sole proprietor – I don’t have any info on what type of legal business you should have in your state and whether you should register as more. This is just what I do). I recommend accepting both Shopify payments and Paypal – some people are more comfortable with the protections that Paypal provides so I like to offer that option.
Add Your Products
If you are selling products that you are shipping yourself out of your house, then you can add them manually under “products” then “add product”. Make sure to fill out the title, description, tags, and add high-quality photos and mockups.
If you are selling print-on-demand products that are shipped for you, link your Shopify to your POD supplier through the Shopify Apps section of your dashboard. In my case I use Printful, so I install the Printful app on my store, then use the prompts on the Printful website to sync them together and add your products.
If you’d like to sell dropshipped or wholesale products, there are dozens of Shopify apps for different merchants that you can browse. Here are some product sourcing apps I recommend checking out from the apps page:
If you decide to sell any products from a dropshipping company, I recommend ordering a sample product from each company you use to see what the processing and shipping times are like, how well it’s packaged, and the overall quality of the product. This is an extremely important yet overlooked detail for many dropshippers.
Make sure your products are set as active and that the “online store” sales channel is selected. This will push them to your storefront and collections so you can then customize how they’re displayed in your store.
Customize Your Homepage
Now that you’ve added products you can start to customize your store’s appearance. Go back to the customize page under themes, then use the menu on the left to play around with your collections, displays, and all the other options for featuring and showing off products. Here are some optional customization suggestions to guide you through:
Add Your “New Arrivals” Collection to the Front Page
If you set up the new arrivals collection, add it to one of the sections on your homepage and choose how many products you want to display.
Add a Slideshow or Banner Under Your Header
Most themes will allow you to add a slideshow, which looks great under your header and can direct your visitors to specific products or collections. Here’s a graphic I made in Canva for a slider page that linked to my summer 2021 collection:
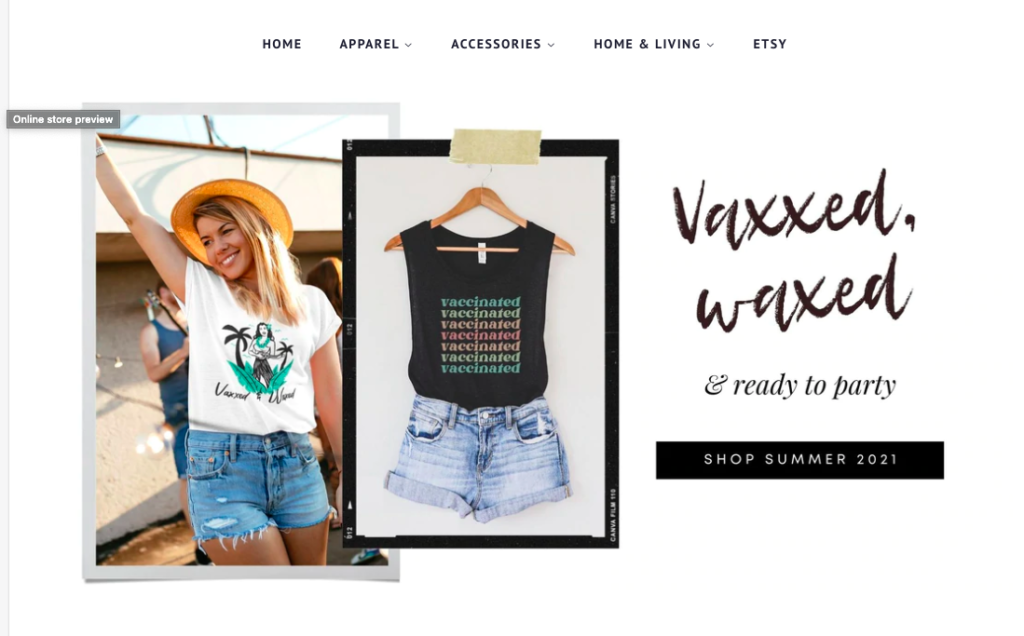
You can even just add one slide for now. I think it looks nicer to have a larger graphic like this before presenting your products. Your theme should tell you the dimensions to upload for the slider graphic, which you can create in Canva. Another option is to create a slide with a discount code, such as “25% off 4 or more mugs” that links to your mug collection.
Add a Featured Product or Collection
Another option is to feature a specific product or collection and give it a whole section on the page. This is good to do if your products are based on a current trend, holiday, or season that you can rotate out regularly.
Create a Navigation Menu
A navigation menu is important to have either above or below your header depending on how you want your theme laid out. You can create a menu from your dashboard under “online store” then “navigation”.
As you can see in the image above, I use the header to link to my general categories such as apparel and home goods, then those have dropdowns to more specific products like t-shirts, posters, etc.
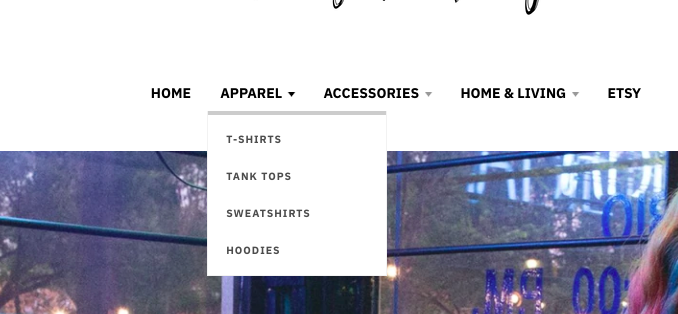
My store also has a footer menu that links to the about page and shipping/FAQs page. It also has contact information and social media links to fill out some blank space.
You can choose where to place your menus through the customization options.
Create Essential Pages for Your Shopify Store
Your store does not need many pages at first, but I recommend creating two basic pages:
Add an About Page
Your shop’s About page is where you briefly describe yourself and/or your store. You can make it as personal toward yourself and your personality as you want, or focus more on the brand and inspiration behind it. Having an about page adds a sense of personalization and credibliity to your shop.
Shipping & FAQs Pages
You should also create a page with shipping info and frequently asked questions. This can be one page or two different pages depending on how much you want to add.
For shipping, check with your POD and dropshipping suppliers for their processing times, ship times, and carriers used so you know what to inform your customers. People like to have an idea of how long it will take for a product to ship, what carrier you use, and whether you offer free shipping. Your suppliers will have a lot of info you can pull for this page.
For your FAQs, you can make up the questions to cover whatever type of info you want to inform your customers about. It’s mainly a page where you can cover your ass by having your shop policies laid out for customers to see. The FAQ page is where I include information about the return and exchange process, how to contact me if an item is damaged or incorrect, and basic information like that.
Add these pages to your store under “online store” in your dashboard, then “pages”. To display them in your store, add the pages to your navigation menus. I didn’t want these pages in my main menu with my products, so I added a footer menu and have them linked in the footer of my website. You can place them wherever you want them.
Once you have taken all of these steps and customized your store to your liking, you are almost ready to publish your store to the public.
Test Your Store Checkout Process
Before you launch your store, you can run a test through the functionality and checkout process to make sure everything is working as intended. Shopify has a video tutorial for how to do a test order and what to make sure you have in place.
So you’ve added products, customized your theme, and ran a test order. If you feel ready, launch your store. The rest of this list is some of my optional but recommended suggestions for apps and customizations that can potentially enhance your shop even more. This is just a very small taste of the many things that Shopify has to offer, so use this opportunity to browse around your dashboard and check out the many options available to you.
Browse the Shopify App Store
Shopify has thousands of apps to choose from that are all designed to improve your store and marketing. There are many free apps but some are also paid, either a one-time fee or monthly subscription. Here are some of the apps I use and recommend:
Google Shopping
I use all of these apps to connect my product catalog to my social media pages. This way you can add clickable shopping links to your products or become a verified merchant which adds credibility and puts your products in front of more people. Search for any social media platforms you use in the app store and follow the instructions to connect your accounts.
Sales Pop – This app pops up a little box in the corner that shows what people have purchased most recently. It costs $4.99 a month, but I like it because it shows that there’s activity in the store and that people are buying your products.
Product Reviews – Reviews are helpful in getting sales, so add this app to allow customers to leave a review.
Digital Downloads – If you sell digital products on Etsy, use this free app to sell digital products on your Shopify store. This allows you to add the file to the product listing so your customer can download it after purchase.
Purchase a Domain Name (Optional But Recommended)
When you first open a store, the URL to your store will be your-shop-name.myshopify.com. This doesn’t look as professional as yourstorename.com, so I recommend buying the actual domain name. Shopify will have an option to do this through Google Domains in your dashboard. This is what I’ve done. If you’ve already purchased a domain through another hosting company, you can set that domain up to forward to your Shopify. Your hosting company should have instructions on how to do that.
Keep Researching, Learning, and Trying New Things
Once these basic steps are completed, you can remove the password and open your shop as soon as you are ready. Your job now is to keep researching and trying new things to see what works for your shop and helps increase views and conversions. Something that helped me come up with ideas for how to design and layout my store was to look at other Shopify stores for inspiration. You’d be surprised how many well-known brands use Shopify, so make note of this next time you’re online shopping. Scroll to the bottom of the website and it will say “Powered by Shopify” in the footer.
Here’s a few Shopify stores I like that you should also check out for inspiration:
As you look at their stores, remember that everything is part of a block or collection. Take note of their slideshows and written copy, their menu items and locations, and what they include in their pages.
I hope this helps make your Shopify setup a bit more digestible. If you find yourself stuck in a specific spot, remember that Shopify has a huge help center with written and video tutorials for all sorts of specific processes you’ll run into along the way. I recommend bookmarking this Shopify checklist that goes through everything on this list and more.
Check out more of my online business content:
How to Sell Printables on Etsy





One Comment